Setting Up an Existing Template
In this article, we start with an existing web site template and set it up in Webvanta. This is the process you'll go through to install your own design, if you want to start from scratch rather than modifying the templates and CSS that we provide with the starter site.
We're using a template from a freecsstemplates.org. The same process applies to any template you may download for free, purchase, or design yourself.
Note that by "template," we don't mean anything fancy here: really just a static HTML page with CSS and image files, which we will turn into a Webvanta template in just a few simple steps. Once you've set it up as a Webvanta template, you can easily create additional pages and add database features, and it's simple for either you or the site owner to modify the content of each page.
Download the template
First we're going to visit freecsstemplates.org, choose a template, and download the zip file that has all required files.

We've just picked a template at random that will enable us to demonstrate how to set one up. The same steps should work for virtually any template.
Create the Site
We need a new, blank Webvanta site to start with, so go to Webvanta.com, click the Free Trial link, and fill in the signup form.
You'll receive an activation email. Click the link in the activation email, set your password, and now your new, largely empty site is ready.
Upload the Images
Decompress the zip file that you've just downloaded, and you should have (within an enclosing folder) an images folder, a CSS file (default.css), an HTML file (index.html), and a license file.
For ease of uploading, compress the images folder, creating a zip file named images.zip. (It is not essential to name the zip file "images" but it minimizes the changes we need to make to the image paths in the template files. All of the image paths in this template reference a directory named "images" and Webvanta can create this images folder automatically from the name of the zip file.)
Now click the Control Panel button at the top right corner of your new site, and choose Content > Images and Files. Click the New File, then the Browse button, and locate the images.zip file on your computer.
Make sure the "Unpack and delete zip file" box is checked. By default, it should be checked.
Click the last checkbox, labeled "Create a folder with the same name...". This will cause the images to be placed in a folder named images.
Install the CSS
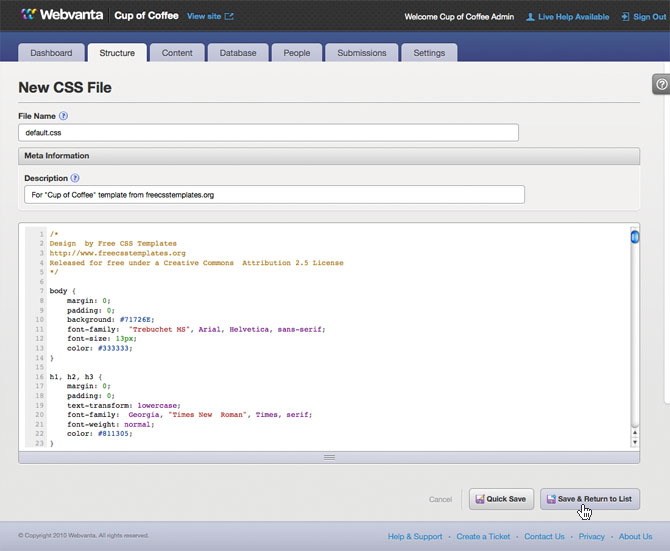
Open the downloaded CSS file, default.css, in any text editor. Select all and copy (cmd/ctrl-A, cmd/ctrl-C) to get the text on your system clipboard.
On your new site, choose Structure > CSS Files, click Add CSS File, and paste the CSS into the body of the form. Enter "default.css" as the File Name (this can be anything, but by using the same name as in the template we minimize the editing we'll have to do).
You can enter a description if you'd like. This appears in your CSS files list to help you remember what each CSS file is for.
Click "Create Save & Return to List" to save the file.
TIP: Before pasting the CSS in the body of the form, open it up in your favorite text editor. Make sure all file paths in the CSS file begin with a slash ("/"). You can do a Find and Replace to change all "url('" to "url('/" or something similar.
Create the Webvanta Template

Now we'll follow a similar process with the downloaded template's index.html file to get our Webvanta template started.
Open index.html in any text editor, select all the text, and copy it to the clipboard.
On your new Webvanta site, choose Structure > Templates, click Add Template, and paste all the HTML into the Content area. Give it any name you want, enter a description, and save the template.
TIP: Before pasting the HTML in the body of the form, open it up in your favorite text editor. Make sure all file paths in the HTML file begin with a slash ("/"). You can do a Find and Replace to change all "src='" to "src='/" or something similar. Also add a slash in front of the CSS file name, changing "default.css" to "/default.css". If you don't do this, the home page will still work fine, but other pages will have issues. Webvanta will actually find the CSS file regardless, but the CSS file will be loaded from a path relative to the page being loaded, and because the image references in the CSS are relative to the location of the CSS file, the image paths will fail for those pages.
Apply the Template to a Page
Now we're ready to apply the new template to a page.
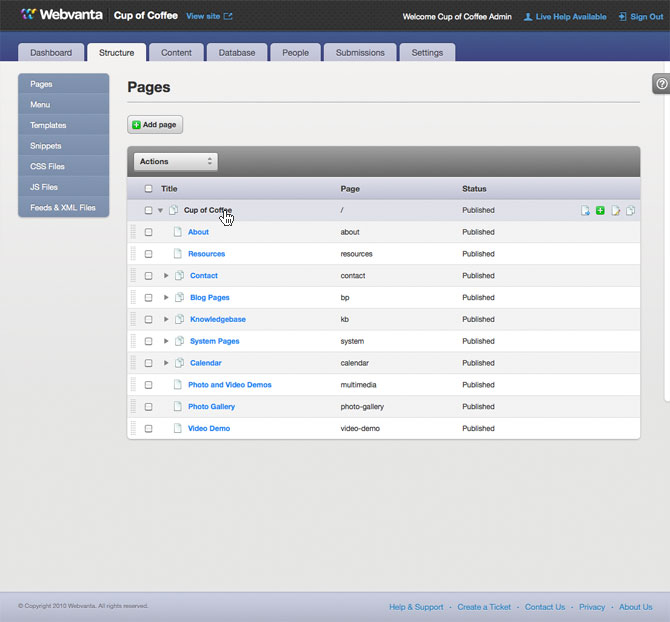
Click Structure > Pages to view the page admin list, and then click on the home page (/) in the list to edit the site's home page.
Apply the Template
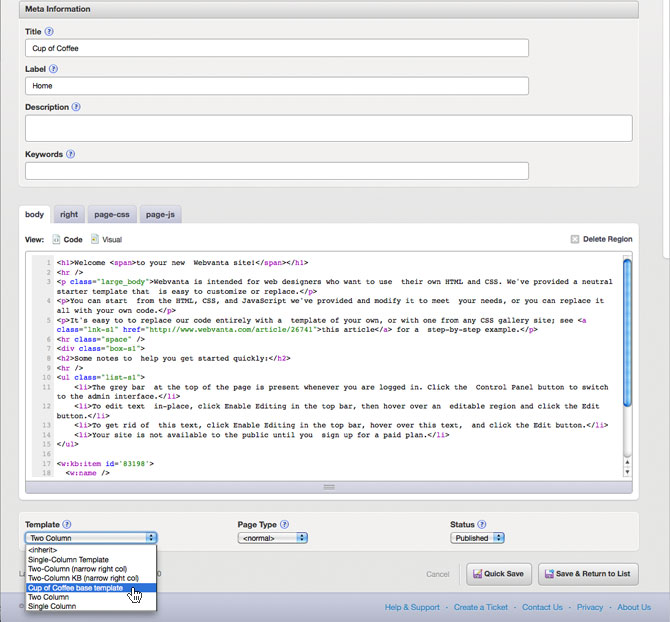
On the page edit screen for the home page, scroll down to see the Template chooser, and select the new template you just created.
Then click Save & Return to List to save the change.
And You're Done! (well, not quite)
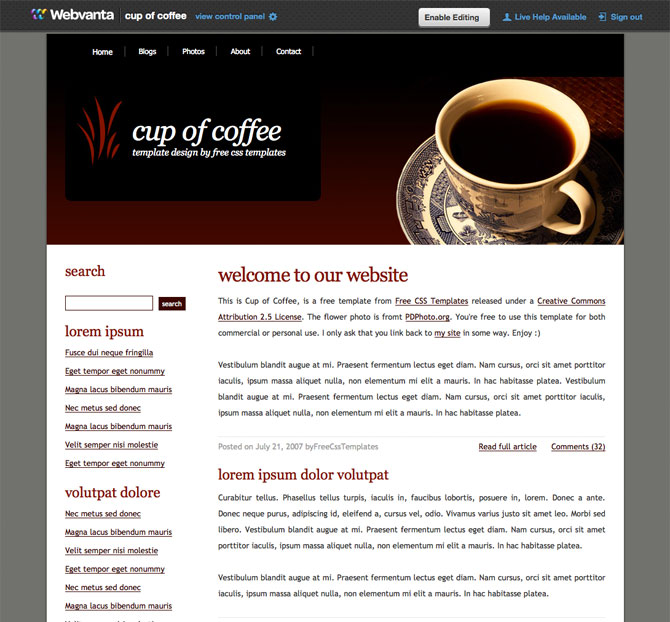
Click the View Site button at the top right corner to see what you've created. Voila! Here's the new template, up and running on Webvanta.
At this point, the page is functional, but we can't yet take advantage of most of Webvanta's editing or menu-creation features. So let's set that up.
Set Up the Metatags
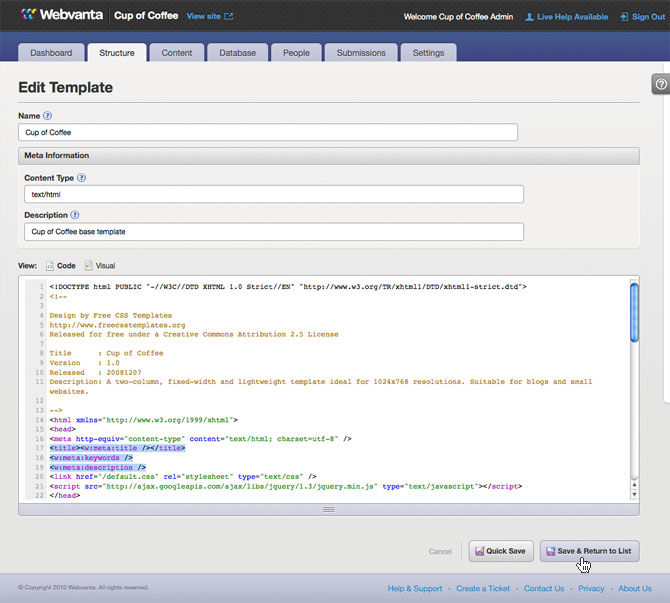
Since we want to be able to use a single template for many pages, we don't want to have a specific page title, keywords, or meta description in the HTML; we want that information to come from the Webvanta database, using the information for whatever page is being shown.
So we replace the three lines in the template with the following:
<title><w:meta:title /></title>
<w:meta:keywords />
<w:meta:description />
These WebvantaScript tags pull the information from the page database for the current page.
Now how would you know which tags to use and what the proper syntax is? There's a variety of ways to find this information:
1. Look at the templates already set up in your site. The head section of those templates is in a snippet, so you can go to Structure > Snippets and look at the html_head snippet.
2. Look at the Webvanta Cookbook (support.webvanta.com/cookbook, also linked from the main Help page), which has all kinds of sample code.
3. Look at the WebvantaScript Cheat Sheet (support.webvanta.com/cheat, also linked from the main Help page), which shows how to use each WebvantaScript statement.
Set Up the Editable Content Regions
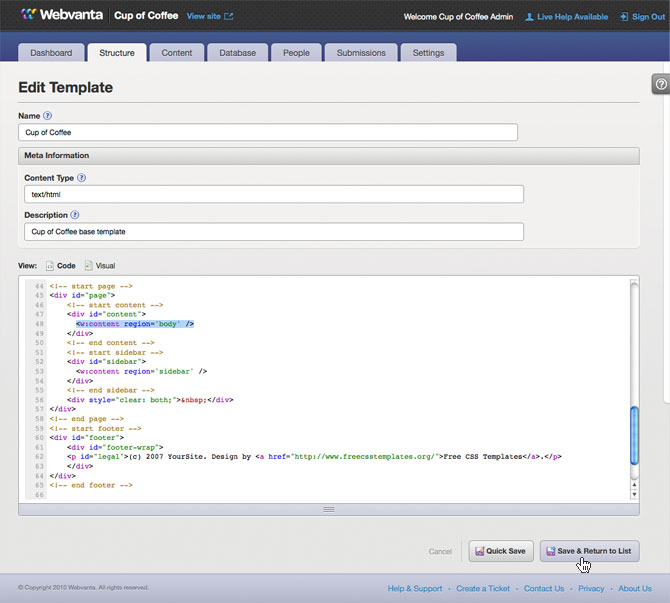
Since this template can be used for many pages, we don't want any page-specific content in the template. So delete out everything inside the div with the ID of "content", and everything inside the div with the ID of "sidebar".
Now, to tell Webvanta that editable content regions should go in each of these spots, insert in place of the page-specific content WebvantaScript content tags:
<w:content region="body" />
and
<w:content region="sidebar" />
Now save the template.
Update the Page
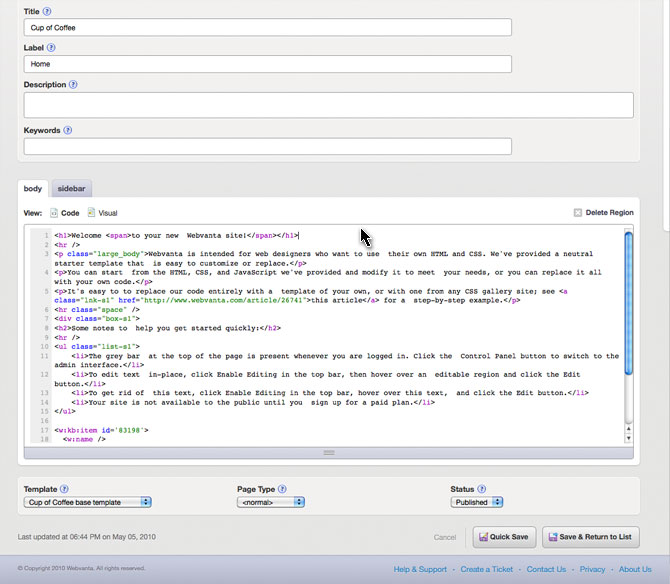
Now we just need to make a small update to the page. Click Pages, then click the home page (/) to edit it.
We've set up new content regions for the template, but the page regions are only updated when the template is first applied, so switch the Template to any of the others, and then back to the Cup of Coffee template. You'll now see the "sidebar" tab appear, since our new template has a content region named sidebar. (Both the original template and the new template have a region called "body", so that one doesn't change.)
Webvanta never deletes anything without your taking a specific action, so the old "right" region is still there. Click on that tab, select all the content, copy it, click on the "sidebar" tab, and paste in the content. (We could have avoided this by calling the sidebar region "right", but that seemed awkard since the sidebar is on the left.)
You can then delete the "right" region, since that isn't used any more. Click on that tab, then click the Delete Region link at the right edge.
Save the page and click View Site in the Control Bar at the top.
Site Content Now in Editable Regions
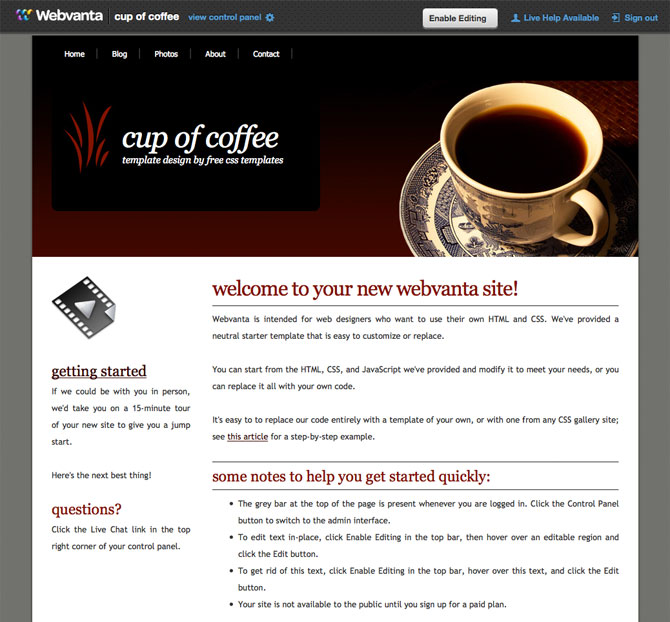
You should now see the starter site home page content in the new template.
Click Enable Editing in the toolbar at the top, and then hover over either of the editable regions.
Editing Page-Specific Content

You can now click the in-place Edit button to edit content right on the page.
Make the Menu Dynamic

Let's make one more improvement: replacing the static navigation code in the template with navigation that is dynamically generated from the page admin list.
Go back to the Control Panel, choose Structure > Templates, and edit the Cup of Coffee template.
Select all list items that creates the menu, and delete them.
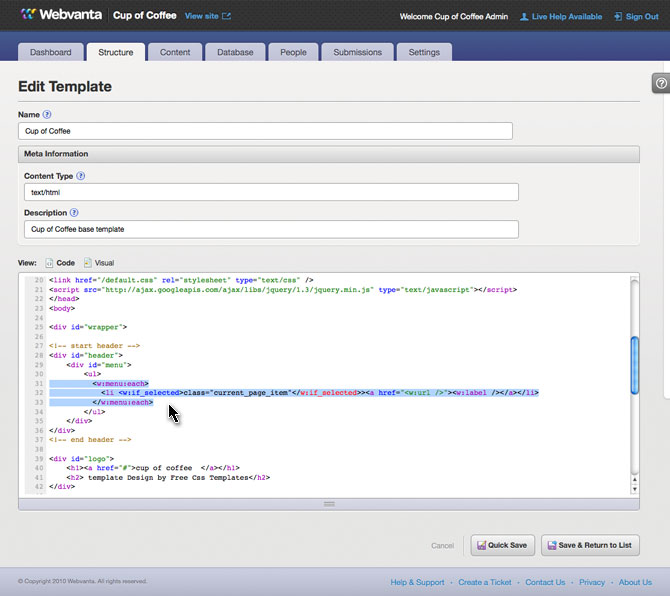
Now we need to insert the code that automatically generates the menu items from the settings in the page admin.
Insert the following code:
<w:menu:each>
    <li <w:if_selected>class="current_page_item"</w:if_selected>><a href="<w:url />"><w:label /></a></li>
</w:menu:each>
This code repeats the <li> line for each page that has been added to the menu (by dragging it into the upper region of the page admin list). The URL and label for each page are inserted at the appropriate points.
By wrapping the class assigment in the <w:if_selected> WebvantaScript statement, this class is added only to the menu item whose URL matches the current page.
You're Done! (almost)

The navigation is now dynamically generated. (The current page menu item doesn't look any different because the template's stylesheet doesn't actually define anything different for the current page, so you may want to change the CSS to make this feature more apparent.)
Finishing Up
We've only changed the template for the home page, so to complete the conversion, apply the new template to all of the other pages that you're going to use.
You'll notice that there's a lot of pages in the starter site that you may not expect. It's best to apply the new template to everything, unless you know for certain that you won't be using certain pages. Here's some notes on specific pages:
- The blog system consists of three pages, which are subpages of "bp".
- The knowlegebase system consists of four pages, which are subpages of "kb".
- There's an assortment of pages in the "system" group that are used for user login and other utility functions.
One alternative to changing the template assignment for each of these pages is to change the contents of the existing templates that these pages use. If you take this approach, you may want to move the HTML head, header, and footer code from the template into snippets, so you don't have to repeat this code in each template, and you have one place to make changes.
Note that if you use the region name "sidebar" in new or modified templates, you'll need to move any page content that is in the region "right" to the region "sidebar." You can avoid this by giving the sidebar region the name "right", at the cost of the potential confusion of having a left-hand sidebard named "right."
CSS Cleanup
On our contact form, you'll notice that the formatting of the form is off with this site's CSS. We have a little bit of CSS in our standard stylesheet that provides the nice alignment of the fields. You can copy the relevant CSS rules from webvanta.css into default.css. Depending on other styles your site sets, this code may require some tweaking to look the way you want.
There's also some styling in webvanta.css that the blog and knolwedgebase pages use. You can't see what these look like until you have some content in your site, so be sure to revisit the design after you have some content set up and see if you want to borrow some of the other code from webvanta.css. You may even want to load all of webvanta.css before the template's defaults.css, but if you do so, you'll also need to load the Blueprint CSS framework (see the html_head snippet for the code), which our CSS builds upon, and you may find conflicts with the template's CSS that you'll need to resolve.
When you use the Rich Text Editor, you'll notice that the styling in the editor area looks like our starter site, not like your new template. You can change the code in webvanta-preview.css to customize how text appears in the editor window. See Customizing the Rich Text Editor for details.
JavaScript Libraries
Finally, note that some of our standard pages use JavaScript and expect certain JS library code to be loaded in the template's head section. The blog pages expect jQuery, and the knowledgebase pages use a YUI widget. Take a look at the snippets html_head and html_head_kb and copy the relevant lines to your template. You can load all the JS on every page, or if you want to minimize the amount of unused JS on your pages, create a separate template for the knowledgebase pages so you can load the YUI code only on those pages.
You now know everything you need to set up an arbitrary HTML/CSS design in Webvanta.