Setting up Private Label Options
If you're a member of our Partner Program, you have the option to private-label the Webvanta system. Your clients will see your brand whenever they are editing their site. You can also provide custom instructions for clients as part of the control panel, provide your own support links in the control panel, and use your own master domain when creating sites at subdomains.
See Creating New Sites as a Design Partner for more information on how to create new sites after your configuration is complete.
Customizable Elements
The things you can customize that affect all of your clients' sites include:
- Logo that is displayed at the left side of the toolbar
- Content that appears in the main dashboard area
- Text for the footer of the control panel
- Whether or not the help panel is displayed
- The link to a support site
- The favicon for the control panel
- The base URL for creation of new sites
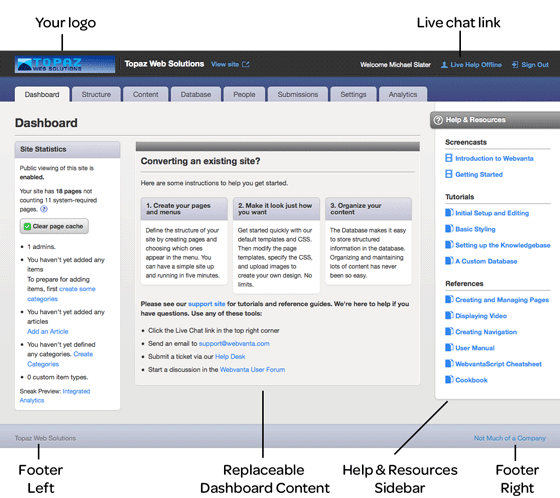
The illustration below shows the customizable elements of the control panel on your clients' sites. Most of these elements are controlled by a single setting on your master site and affect all of your clients' sites. The replaceable dashboard content, however, can be customized for each client site, so you can provide client-specific instructions right in the admin system..
Private Label Configuration
When you join the Design Partner Program, you get a Webvanta site that serves as your "master" site. You'll notice that this site has a few more menu items in the Settings menu, such as Private Label Config. The private-label configuration settings affect all of your clients' sites.
The table below shows all of the available settings, which you can change via Partner > Private Label Config. The sections following describe how to use them.
| Setting | Description | Suggested Use |
|---|---|---|
| company.asset.domain.name | Asset domain name | Set to the domain of your master site, such as mysite.webvanta.com or www.mysite.com |
| company.logo | Path to company logo image shown in toolbar; domain is determined by company.asset.domain.name | Path to a png, jpg, or gif image, max. 35px high and 200 px wide |
| company.favicon | Path to favicon for client sites' control panel; domain is determined by company.asset.domain.name | Path to your company's favicon.ico file |
| company.name | Company name used in various places | Your company name |
| footer.left | HTML for the left side of the footer | Your company name |
| footer.right | HTML for the right side of the footer | Your phone number and support links |
| dashboard.intro | HTML for the main dashboard area (default for all client sites, can be overridden for individual sites) | General information for your clients |
| dashboard.intro.snippet.name | Name of snippet to use for site-specific dashboard contents | Can be anything you'd like, such as "site-intro" |
| help.links? | Enables Help & Resources sidebar on clients' sites | false, unless your clients are technical enough to find our help documents useful |
| url.support | URL used anywhere in control panel where there is a link to “Support” | URL for your helpdesk site or contact form |
| company.base.domain.name | Base domain name used when creating new sites, and for links in emails | Do not change without contacting us first; requires DNS setup and server setup |
Setting Up Your Branding
Installing Your Logo
If you've signed up for the private-label feature, no doubt you want to use your own logo instead of ours. To do so, follow these steps, all in your master site control panel:
- Choose Content > Images & Files.
- Create a folder named "private-label" (not essential, this is just a suggestion to keep things organized) and select that folder.
- Upload your logo file.
- Set the private-label setting
company.asset.domain.nameto the domain name for your master site (e.g., my-master-site.webvanta.com, unless you have mapped this site to a full domain. - Set the private-label setting
company.logoto the path to your logo file (e.g.,/private-label/my-logo.png).
Your logo will appear against a dark gray background. It generally looks best if your logo file has a transparent background and light-colored content. If that doesn't work for you, you can fill the logo image background with whatever color you'd like and it will appear as a block on top of the gray bar.
Your logo will appear on your master site, as well as on your clients' sites. You may need to log out and then log back in before it appears.
Using Your Favicon
To complete the branding images, set your favicon, which appears in the browser tab and titlebar when one of your clients accesses their control panel. Upload your favicon.ico file to the private-label folder (or another location of your choosing), and change the private-label setting company.favicon to point to it (e.g., /private-label/favicon.ico).
Company Name and Footer Text
Next, you'll want to set company.name to the name of your company; this text is used as the alt attribute for the company logo in the toolbar, and it also appears in other places, such as on the new user welcome page.
Finally, you should enter HTML content to go in the control panel footer. This is in two parts, one for the left side (footer.left) and one for the right side (footer.right). It's entirely up to you what content you want to put here; if you want to leave one or the other or both blank, enter a non-breaking space ( ). If you don't enter anything for these settings, the standard Webvanta name and links to our help and support pages will appear. You can override the styling using inline styles if you'd like.
At this point, your basic branding is in place, but there's a few more things you'll probably want to change.
The Dashboard Content
You can control the main content of the control panel dashboard (the home page of the control panel) in two ways.
First, the block of HTML in the private-label setting dashboard.intro will display, by default, on all your clients' sites. You'll want to put something here, unless your clients are designers, since otherwise the standard Webvanta content will be displayed, and it talks about how to build a site. This can be any amount of HTML, even though it may seem odd to paste a lot of HTML into such a small field.
Often, the best use of this area is to provide client-specific instructions that differ from one site to another. To do so, there's three steps:
- Enter the name of the snippet you'll use for the dashboard content in the private-label setting
dashboard.intro.snippet.name. We suggest something likesite-intro. Note that this must be a valid snippet name, so it cannot have any spaces. - Now, on each of your clients' sites, create a snippet (note: not a global setting) of the name you specified in the step above.
- Put in this snippet the client-specific content that you want to have appear on that site's dashboard.
If the snippet is missing on any site, then your default dashboard text (determined by the private-label setting dashboard.into on your master site) will be shown. And if that setting is blank, the standard Webvanta dashboard content will appear.
Help and Support Links
There are several things you can configure about the help and support links on your clients' sites:
- Whether the Webvanta help panel appears
- What is used for the support link on error pages and other system-generated pages.
Deciding what to do with these options depends on who your clients are, and how you want to handle support. In general, Webvanta's support articles are intended for web designers, and therefore generally aren't appropriate for your clients. Also, our help documents are not available private-labeled. So we recommend that you disable our help links and provide ones that go directly to your own resources.
If we get support tickets from your clients, we will refer them to you, unless the client has a direct support account with Webvanta.
To set up your support links, make the following changes:
- Change the private-label setting
help.links?tofalse. This keeps the Webvanta help panel from appearing on the right side fo the control panel. - Change the private-label setting
live.chat.htmlto an HTML fragment, linking to your chat system or support page (e.g.,<a href="http://designbiz.com/support">Support</a>. - Put the URL for your support page in the private-label setting
url.support. - We suggest also putting support links in the control panel footer, via the private-label settings
footer.leftandfooter.right.
Customizing Your Base Domain
You're almost done! In fact, you can choose to be done now, if you're ok with new sites using a subdomain of webvanta.com until they have a full domain name assigned to them (e.g., customer-name.webvanta.com).
If you want to have your own base domain name for new sites, such as clientname.mydesignbiz.com, there some additional setup work to be done. You can find detailed instructions in this article:
Setting Up a Private-Label Master Domain